Showing posts with label Tags. Show all posts

18 June 2014

JULY THE 4TH TAGS


The images were in my July 4th stash, sorry I can't attribute the source.  Patterned papers are from Farmhouse Paper Company, embellishments are from K&Co.  Stickles and bits of trim from my stash finish them up.


Tim Holtz patterned papers and K&Co embellishments.


12 February 2014

CHRISTMAS IN THE BANK (02/2014)

As I have done for several years now, I try to continue crafting for Christmas throughout the year so that when the holiday comes around I have "Christmas In The Bank"!  I plan to share some of my projects with you on the 12th of each month.  If you are also crafting Christmas throughout the year, leave me a comment and I will come to visit!

I was tickled to find this project!  "Vintage Mitten" ornament/tag digital collage sheet from My Artistic Adventures.  Not only has Heather created the images needed (available through instant download), she has also done an easy to follow step by step video.  Talk about value!  I loved that these were so "stash friendly", the images were provided for me, all I did was dig through my bits and pieces to embellish them.


I asked Heather if she would do just the Candy Canes (she is happy to do special requests), I think they make the perfect table favours as well as ornaments!


I love it when some bit of the Christmas "leavings" can be rescued.  These little tags were punched from a bottle bag that had seen all of it's lives used :)  I punched some card stock to back them and finished them with a teeny eyelet and a bit of baker's twine.  A few more bits into the "Christmas Bank"!


25 January 2014

OUT OF THE SCRAP BAG - VALENTINE TAGS

I sat down earlier this week with my bag of Valentine scraps to make a few tags.  Some of the bits have been around for a few years so I won't try to identify their origin.  I have been doing a number of variations on the same themes or structures lately so it was time to push bits around a bit and see what happened.

Note:  I have looped a bit of ribbon through the tags only for the pictures.  I find it much easier to store my tags without ribbon and do that as I use them.


28 May 2013

PATRIOTIC TAGS

Inspired by Heather's collage sheets and still in the grip of "I must make tags" LOL   Seems like good timing for these with Flag Day coming soon and the 4th of July before you know it.


I used two different collage sheets from Heather (available from her Etsy shop, it's a great one to favourite!)  My fav tag is the one in the middle and that is also my favourite of the two sheets only because I prefer the cream background (more primitive or Americana) to the white of the 2nd set - all of the images are super.

26 May 2013

"LITTLE BOY TAGS"

The tag "bug" clearly has me in it's clutches.  I had so much fun with the doll tags that I had to have some boy tags to add to my stash.  While girls rule in the grands (6 out of 10), once in awhile I can squeeze out a crafty something for the boys too LOL

The papers are all from Farmhouse (new company to me!), the boy and suitcase stamps are from Magnolia and all the bits are from my stash.  I need more of that word printed twill but don't recall where it came from!


20 May 2013

FAIRY TAGS

A mini road trip on Saturday to meet up halfway with an out-of-town friend  included a visit to Treasured Memories.  I fell for the Crafter's Companion "Angelica and Friends" stamp collection and picked up "Grace" and three sets of the "Spectrum Noir" markers.  I am not foremost a stamper/colourist but at about $2 a marker this is a comfortable investment for me.  I will go for some instruction LOL but here are my first efforts.


With six granddaughters, I have a lot of use for these!  Miscl flowers. Papers are mostly Crate Paper and WRMK.  Everything edged with Platinum Stickles.  Seam binding ribbon from Martha Stewart, I stocked up a couple of years ago when it went on clearance.  Edge punch is also from Martha Stewart.

17 May 2013

PAPERDOLL BIRTHDAY TAG (JULIE NUTTING/PRIMA)

Spent last weekend at a craft retreat with a couple of my crafty friends..lots to tell about that!  One of the other crafters was working with paperdoll stamps which we were ooohing and aawwing over..she generously let several of us stamp a few to work with.  The stamps are designed by Julie Nutting for Prima, Julie has done several videos so run and have a look!  This is my take on one of her tags.


I have used papers from Simple Stories and G45, Prima flowers, Cinnamon Stickles, Memory Box and PSX stamps and vintage sheet music medallions.  The tag is 8.5 x 3.5 cut from a manila file folder. The paperdoll stamp is about 7.5" and popped up off the tag.  Have you played paperdolls lately?

1 February 2013

NANCY MAXWELL JAMES, 14 HEARTS - DAY 1

If you haven't been paying attention, it's only the first day of Nancy Maxwell James 14 Hearts project go and have a look!  Badge at the right.

Todays project is absolutely scrumptious!  I have my eye on an old carved box which needs some attention, so just maybe I will take on the entire project.  I did get one tag completed today LOL  It was fun to play in the neutral palette that is so "Nancy" and I was inspired to cut into some of my vintage French papers.


I copied the illustration out of an October 22, 1882 edition of "La Mode Illustree, Journal De La Famille" but I did cut into a page of text for the scallops and butterfly.  The bit of hand tatted lace is from a bundle of 10 yards (!) I picked up locally a couple of weeks ago.  A couple of vintage buttons, seam binding ribbon and a Prima flower finish it up.

GECKOGALZ GUEST ARTIST FOR FEBRUARY!

I was delighted to be asked by Leanne Seed of GeckoGalz to do a Guest Artist spot!  I met Leanne a couple of years ago through Bella Creations where she was an incredible supporter of the design team members and their groups, members of the forums and a monthly sponsor for the site.  And she is a Texas gal!  Being born in San Antonio, I have always had a soft spot for those Texas gals.  

If you are unfamiliar with GeckoGalz, I urge you to RUN over there right now and check out the incredible products!  I can attest for the quality of the images and they are priced so that you can indulge yourself.  So get going!  But don`t forget to come back here LOL

I plan to post my projects one at a time through out the next several weeks.  Now you know I am not much of a photographer and it is a mostly dark and dreary January here, I am sorry the photos aren`t better!

Starting with ``Special Delivery``.  If you have been watching, this is the pattern I provided as part of the January  ``Christmas In the Bank`` challenge, which I did using sheet music.  This first one is paper from the February set of papers ``Pocketful of Poseys`` at GeckoGalz.  I adore each of the papers in this set, perfect for shabby, vintage and spring!  I added a paper, hand cut ribbon with message, a ruby ``eye`` and lots of Stickles along the edges and then did several sizes in papers from my stash.


13 January 2013

CHRISTMAS IN THE BANK (#1A)

Our project challenge this month is to build our holiday stash creating tags (see January 12th post).  I am sharing another idea that you can create in just a few steps and I hope using what you have on hand. I hope to provide inspiration and encourage you to let your own ideas flow!

I am not a "birder" but I think this shape is at least like a swallow LOL

I glued vintage sheet music  on the front and back of a sheet of plain cardstock, traced the pattern with a pencil and cut it out.  I marked the pattern for you with placements for both a hole to hang the tag and where to put an eye :)  I used Enamel Accent in black for the eye, edged this one in gold stickles and used Walnut Stain Distress Ink (the next ones I used Vintage Paper Distress Ink which is light and seems like the obvious choice after the fact!).  A bit of gold rick rack for the ribbon hanger.


In my stash I have a booklet of labels from the French General, I used one on the back to provide a bit of clear writing space.


Here is the pattern template for you, don't forget to right click and save the 2nd larger image. I printed out the pattern out once but sized it so that 4 would fit on an 8" x 10" which makes a nice size for a simple tag.  I am going to try a couple at twice this size, I think they would make a pretty spectacular treatment for gift wrapping.  Have fun and be sure to show off all your ideas!


18 November 2012

"FEELING BLUE" - FUSSY & FANCY CHALLENGE # 76

For the first time ever I am suddenly really taken with blue for the holidays.  I saw this challenge on  a new followers blog (thanks May!) and thought perfect!  The beginnings of this tag were an attempt at the 12 Tags of Christmas probably 2 years ago.  Wasn't happy with it but had put so much effort into it that I didn't toss it in file 13.  I had a request for a stocking tag for Baby Jack and pulled this one out.  I have a few more skills now and thought perhaps I could do something with it!  Baby Jack's mom said "what a tiny head that snowman has"... part of being a snowman with attitude I think!

Check out the fabulous creations at the Fussy and Fancy Friday Challenge Blog!


8 November 2012

SNOWFLAKE ANGEL CHRISTMAS TAGS


I'm still working off the tags shared by Nancy Maxwell James of Sugar Lump Studios.  She has just posted a fabric album using these same images "Little Angels" from Digital Collage Sheets.

Background papers are glittery picks from  Laundry Line by MME - a favourite I have been hanging on to for several years.   Again Stickles for a glittery outline and a bit of shabby ribbon for the top.  The snowflakes I picked up at Michael's, added a bit of microfine warm highlights glitter to soften up the pure silver they started with and centered them with a vintage pearl button.  Snowflakes and button adhered with E6000.


MY "MERRY FAMILY" CHRISTMAS TAGS

No they really aren't "my" family!  These images are from Michelle of  Digital Collage Sheets.  Fell head over heals for this set LOL  I just couldn't resist playing on the sober expressions.  I have some special plans yet for "Granny Mary Merry"!   Still working on producing a pile of tags for our girls, so keeping these simple - Stickles, dimensional embellishments and a bit of crinkled ribbon!


6 November 2012

PRETTY IN PINK ANGEL TAGS

I am working on doing a pile of holiday tags for each of our four girls, wanting to give them a bit of an early holiday gift wrapping stash.  I will embellish a few for each of them but mostly they will be simple.  Make them too precious and they don't get used!  I have cut a lot of simple tags in different sizes on my Cricut from patterned paper, I will dig through my old cards and see what tags can be punched from those.  Some of my favourites are punched from old photos..I will share those later.

These are inspired by Nancy Maxwell James  (Sugar Lump Studios) "SnowFlake Angel Tags".   I used the same images as she did from Digital Collage Sheets on Etsy.  I found some sweet K&CO poinsettia tags in my stash and decided to use those instead of snowflakes.  Also from my stash;  pp  "Eskimo Kisses" from Basic Grey, bits of a Zva pink crystal swirl, crinkly ribbon and various colours of Stickles.  I used #8 manila tags as the base.


I am very impressed with the quality of the images from Michelle at Digital Collage Sheets, do check her Etsy site out!  And if you aren't familiar with Sugar Lump Studios well you have quite a treat in store for you!

10 December 2011

RETRO HOLIDAY GIFT TAGS

Sometimes a little something simple is just the thing.  Still in their cellophane packet these were 12 for 10 cents, maybe from the dime store?  Is the dime store part of your memories?  I recall wooden floors and the candy counter and being introduced to Sea Foam by my friend Deb.  Breath deep and take a moment for a bit of nostalgia.


10 December 2010

12 TAGS OF CHRISTMAS BY TIM HOLTZ - #9


(#3 for Sandi)  Crazy over rosettes - don't have the die but it is still on my "maybe wish list".  I made a gazillion rosettes last year for different projects and really had an inspired (which totally worked which is not always the case) idea!  Use the ScorePal!  Cut 12" strips of paper in half the width you want the total diameter of your rosette to be.  Then score where you want the fold lines ie every 1/2" works for larger rosettes and 1/4" for smaller.  Don't worry about hills and valleys you can still fold back and forth.  So watch Tim's Tutorial for all the rest of the bits after you have cut and folded your paper.  Is that cheeky of me or what?  For this tag I used a 1 1/4" inch strip and cut a nice edge with "postage stamp" decorative scissors. 

Dipped into my vintage buttons for the "accoutrement's" picked out a few that I liked on this and Bob's your uncle!  Well actually Bob is my DH.  It is sleep deprivation folks - I predict there is going to be an official syndrome named after Tim that occurs on the 1st 12 days of December every year.

9 December 2010

MY TAKE ON A PREVIOUS TIM TAG


Now looking back I am not even sure which tag this was inspired by (I think the one with the lamppost which is a stamp I still don`t have)!  I remember following Tim and burning the edges of the music paper that first time- that was fun at the time but nope gilding, inking and spraying is just fine for edges thanks.  I do like the fussy cut reindeer which is heat embossed and popped up. My version has lots of shimmery mistiness, gilt pen and glossy finish.  It`s easy to follow and I spent sometime last night doing a few.  I have left off all of the pretties around the ribbon, it`s easy to add bits which go along with whatever gift or you use these on.  I adore the Tim Tags but needed a break from the technique heavy poinsettia tag!  Have you seen today's tag!  Rosettes and truly vintage - I`am going to have fun doing that one..

8 December 2010

12 TAGS OF CHRISTMAS BY TIM HOLTZ - #7


Ok so I have managed to finish two out of seven!  I know there are any number of crafters who are keeping up - I swear they do not sleep!  Love learning all of the techniques but holy doodle they are labour intensive.   The technique on this one that I know I will use lots is inking the top of the embossing folder before embossing!  You just hit the high spots and then after you have embossed your piece you hit those high spots with ink..try it, you will like it.

30 November 2010

DANCE OF THE SNOWFLAKES - A HOLIDAY TAG

My entry for a mini-challenge from the group "What Do You Ink" at "Pages In Time".  The challenge was to create a project with a theme from the "Nutcracker".   Click on the title of this post to check out "Pages In Time".


I cut the tag on Cricut (Basic George) from a piece of G45 (The Night Before Christmas) which is a blue and cream snowy look pattern. I debossed this using the Big Shot with the Tim snowflake folder.  Next I randomly inked the raised areas with cream VersaMagic and heat embossed with white. I used a silver gilt ink pen to randomly distress over both the heat embossed and plain areas and the edges.

The ballerina/fairy I stamped with black Stazon on a scrap of the same paper, fussy cut it out and used a strip of foam to adhere it. This got a coat of Rock Candy Distress which I also dabbed on randomly for a bit of shine here and there.

The snow at the bottom is several bits of roses cut off a strip from American Crafts. The snowflakes I punched (MS) from both a white and a silver foil cardstock. The white ones at the top I edged with black ink for a bit of definition and topped these with clear gems (Kaiser). I used a platinum ultra-fine glitter (Glitter Ritz) around the edges of the tag. Ribbons - a bit of a white dotted organza and some silver wired ribbon which I cut in half widthwise.

11 November 2010

VINTAGE STYLE HOLIDAY TAG - AND A FLOWER TUTORIAL

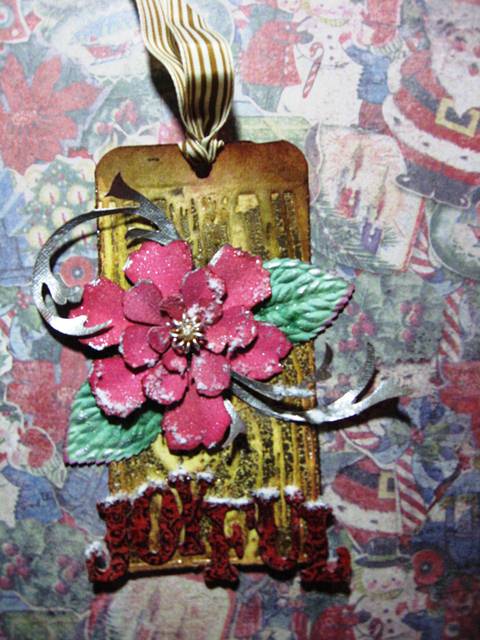
It's time for me to switch over to Christmas!  This is a tag I have made for a "tag swap" over at Pages In Time.  I made this type of flower when I was a child doing "projects" - I always called them Fortune Cookie flowers.  I've outlined the steps to make these below!  Feel free to e-mail me (see button on right) if you have questions.


1.  Cut five same sized circles based on the size of flower you want to create.  Fabric, felt, paper, crepe can all work by adjusting your adhesive to the appropriate one.  On this one I used pinking shears.  Scallops work well.  You can also free hand a simple flower shape and copy that five times.  A plain edge also works.  Create the look you want.

2.  Put one flower down flat as your base.  Take a second flower and add a drop of glue to the center of that flower folding it in half.  Put a drop of glue into the center of your 1st flower and put your second flower down over the left half of your first flower.

3.  Move this little stack counterclockwise so that the 2nd flower is on the lower half.  Add a drop of glue to the center of the third flower and fold in half.  Put a drop of glue into the center of your stack and put this third flower on the left side of your stack.  Partially over the top of your 2nd flower.

4.  Turn your stack again so that your 3rd flower is on the bottom.  Add a drop of glue to the center of your 4th flower and fold it in half.  Again add that to the left half of your stack with a drop of glue in the center of the stack.

5.  Add a drop of glue to the center of your last flower and fold that in half.  Bring the top of  your 4th flower back a bit add a crop of glue to the center of the stack.  Put your 5th flower onto the upper half of the stack.  The left side of this last flower will be under the upper half of the 4th flower.

6.  I like to use a button for the center but of course you can use more typical flower centers.  Push or pinch all of the flower petals up at the center and glue in your center.  I used Platinum Stickles on the edges of this one.  The vintage crepe did bleed into it and turn it red but in this case it looks fine.

Have fun!
Photobucket